Showing posts with label Milani Cosmetics. Show all posts

Sunday, August 3, 2014

Let's Play Catch Up

Posted by Starlett Approved at 4:45 PM 0 comments
Hey Beauties, I know it's been a while since I made a blog post.  If you follow me on Twitter, Tumblr and/or Instagram you know that I didn't disappear completely.  So today's post will include all the things I didn't make a blog post for, that I posted on my other social networks...yay.  This is going to be a long one.  Hmmm why don't we start this baby with NAILS!


I did these babies back in May for our family Disney Vacation in California.  So neon, so awesome.  For this design I used Floss Gloss Dimepiece, Milani Cosmetics Pink Hottie and Forever 21 Neon Green.


This delicious little swatch is Milani Cosmetics Sugar High on top of Wet n Wild Tropicalia.
Ugh I loved these...sheer black is EVERYTHING to me right now.  I'm definitely going to make some more sheer colors. For this I used Revlon Black Magic, Wet n Wild Fantasy Makers Confetti, Daily Charme Swarovski Crystals and Born Pretty Store Swarovski Crystals.


My Fourth of July nails...obviously ;).  Later that week I added glitter to the polka dots and stripes nail and it looked so awesome.  I hate when I think of glitter after the fact :(.  For these I used Revlon Spirit, Wet n Wild Red Red, Sally Hansen Pacific Blue, and Jade Psicodelica.


Now for my most recent nails, I did these last week.  Some neon aztec nails with some studs and a frame nail on top of Ninja Polish FLOAM! Oh my gosh, I forgot I had this guys.  Can you believe that?  How dare I. The neon pink is Jesse's Girl Beach Babe and the studs are from Born Pretty Store.

Now...the makeup! Here is a Tropical Summery Ombre Lip I did using Kaoir Cosmetics Truly Outrageous and Ooh La La.


Next up are swatches of some of the lipsticks I got from the NYX Macaron Lippie Collection.  


Pistachio

Lavender

Chambord

Last but not least, a hair update.  My hair journey is going so great.  It was rough in the beginning but back in February I did a final trim, that got rid of all the damaged hair.  I'm completely in love with my natural hair.  It's healthy and I'm very happy.  Coming up I want to share with you my hair routine and favorite hair products.  Until then here is a photoset I create for my natural hair 2 year anniversary last month. 

If you made it this far THANK YOU, I LOVE YOU!!! This was a lot :).  I'm going to try really hard to not have to do this again. *crosses fingers* 

Thanks For Stopping By!

Friday, January 17, 2014

Floral Nail Art

Posted by Starlett Approved at 1:12 PM 0 comments
Hey babes!  How is everyone doing? Awesome I hope ;). Today's post is going to be short and sweet because my brain isn't working right now lol. So I'm just going to throw down the picture of my nails here :)
I really love floral designs and I love how these came out. To me the beauty of a floral print anything is in the imperfections.  No need for perfect lines and brush strokes.  Another great thing...you don't need a lot of tools.  You can create a beautiful floral design with just the nail polish brush and a toothpick. 
For these I used a small dotter, a tiny detail brush and a small triangle shaped brush (not sure how to describe it). Here's a list of the polishes I used:

New York Color SideWalkers 
Wet n Wild On A Trip
New York Color Lavender Cupcake
H & M Beauty Bandit
Essie Mesmerize
Essie Bikini So Teeny
H & M Something Blue
Wet n Wild Candy-Licious
New York Color City Sweets Pink
Milani Cosmetics Rapid Cherry
Sephora by O.P.I Caught With My Khakis Down
Sephora Military Jacket

Thanks For Stopping By!!


Friday, January 4, 2013

Fantasy Fire over Milani Deep Thought- Swatches

Posted by Starlett Approved at 12:45 PM 4 comments
Happy New Year lovers! I can't believe it's already 2013. What happened to 2012, it seriously just zoomed by. For the New Year my blog-elution is to do more swatches and makeup posts.  To kick off that resolution, today I have for you my first manicure.  Max Factor Fantasy Fire over Milani Deep Thoughts.
There is nothing new I can say about Fantasy Fire that you don't already know.  It's just EPIC, simply put.  The way it transforms a color is magical.  When I first got it last year I wore it over the always popular Revlon Royal, you can see that here.  I tried it before over purple but it wasn't the right purple.  Milani Deep Thoughts is the PERFECT purple for Fantasy Fire.  It's just this deep rich hue and the formula is AH-MAZING! 
Look at the gorgeous color shift from red to gold to green.  Just to let you know this is a picture heavy post....next picture lol!
This is my FAVORITE photo.  I can't believe I was able to capture this, the blessings of a lightbox hehe.  
Here's a close-up, Fantasy Fire is honestly the perfect name for this nail polish.  It makes me think of a dragons' breath, especially over Deep Thoughts.  There's a very mythical look to it or I'm just bugging from my cold lol.
SWOON! :D  I think I might like it over Deep Thoughts more than Royal.
What do you think?  What's your favorite Fantasy Fire combo?  Is there a color combo you would like to see Fantasy Fire/Clarins 230 over?  Let me know below ;)

Thanks For Stopping By!

Saturday, December 29, 2012

Then and Now Week 4

Posted by Starlett Approved at 11:23 AM 8 comments
Hi loves!
Yes I know I've been gone FOREVER.  I'm sorry I disappeared.  Life and the holidays took a hold of me.  It left me with little energy and motivation to do my own nails.  Yesterday I was bit by the inspiration bug and finally did nail art.  So today I have for you my 4th installment of the Then and Now Challenge.
I loved my original design, it was inspired by Hey Nice Nails! They are the reason I fell in love with negative space nail art.  It's so minimalist and modern.  Just super cool to me :).
This time around I didn't choose a design that I could improve on, just do differently.  I was having a hard time figuring out how to change it up.  Then a rainbow graffiti style tape mani came to me all thanks to my dear dear friend, my boo Alexandra aka Algae Veronica
These were very easy to do.  All you need is tape, I used French manicure tape, a makeup sponge and of course the nail colors of your choice.  To help the colors stand out I used a white base before I started sponging on the colors.

I'm going to try to not vanish on you guys again :). Have a great last weekend of 2012!!!


What I Used:

  • Sally Hansen Jewel Overcoat Multi-Faceted
  • Milani White On The Spot
  • Milani Fast Fuchsia
  • Milani Dude Blue
  • Milani Violet Dash
  • Milani Yellow Whiz
  • Milani Black Swift
Thanks For Stopping By!!!

Sunday, December 2, 2012

Then & Now Week 3

Posted by Starlett Approved at 6:41 PM 2 comments
Hey everyone, I've missed you guys.  Did you miss me? ;) It's week 3 of the Then & Now Challenge.  I was so close to skipping this week.  I've been in a blah mood this past week.  I did do my nails a few times but hated something about it, so I never bothered posting them.  Yesterday I finally felt great and decided to do my challenge nails.  My brand new bottle of Seche Vite decides to commit suicide and shatters all over my kitchen floor.  Tears and top coat everywhere.  I used a whatever top coat and my nails were ruined in 10 minutes eventhough they were dry :(.  I did them over this morning making sure I took pictures before doing anything with my hands and I like them much more than my attempt yesterday.  So I'm actually thankful that it got ruined hehe.   Now here are my nails!
I don't remember a lot about these nails.  I recall seeing the design while scrolling through my tumblr dashboard last year thinking WHAT? Outlined drips? HOT!!!
These days they aren't a big deal haha but I still love the effect of outlined drips.  I probably like drip nails as much as I love animal print nails.  It's easy to do and pretty cool looking.
For this design I used my favorite blue, black and pink nail polish.  Nails Inc. Baker Street, Milani Black Swift and Sephora by OPI It's My Pink from the Betsey Johnson Collection.  It's scented and smells AH-MAZING.  I've been sniffing my nails all day.  Yeah I'm smelling them right now :D.

Please don't forget to let me know if you are doing the challenge as well.

Thanks For Stopping By!

Saturday, November 24, 2012

Then & Now Week 2

Posted by Starlett Approved at 1:17 PM 4 comments
Hey peeps, today I have my second installment of the Then & Now challenge.  I got more rainbow and animal print for you.  I sort of love rainbow and animal print hehe!
I loved the original design, you can see its post here and here on tumblr.  I remember I did these right before Hurricane Irene hit NYC last year.  It's also one of Mr. Starlett Approved's  favorite designs of all time.  He's been waiting for this day a long time haha.
For my first try to get the gradient I just painted each polish in thick stripes and overlapped the colors on my nails.  I used Sally Hansen Hot Yellow, Milani Tropical Fiesta and Milani Breezy.  I used one of those Sally Hansen nail art pens for the leopard print.
This time around I figured out the best way for me to do gradients.  I started with 2 coats of Milani  Yellow Whiz.  Then directly on a makeup sponge I painted vertical lines with Yellow Whiz, Milani Fast Fuchsia and Brucci Gianna's "Rockin" Blue, overlapping just a bit.  I did that about 3 times for each nail and it came out great and didn't take forever.  I like when designs don't take forever :) I used my Cina Black Nail Art Pen for the leopard print.
On the accent nails I used 2 coats of Floss Gloss Dimepiece for the base.  Oh gerd I LOVE it, it's so sparkly!  The formula was thick and coarse, which I don't mind.  That's what makes it so sexy and glittery and I only needed 2 coats for full coverage.  It's just packed to the max with glitter.  Which means I needed 2 coats of Seche Vite to smooth it out.
On top of that, as you can see in this photo, I painted multi-colored leopard print using Yellow Whiz, Fast Fuchsia and GRB.  I was originally going to leave it like this.  Then later on I added the larger black leopard print.  I was worried it would be too much but it's perfect to me.

Have any of you joined in on the challenge?  If so definitely let me know ;)

What I Used:
  • Milani Yellow Whiz
  • Milani Fast Fuchsia
  • Brucci Gianna's "Rockin" Blue
  • Floss Gloss Dimepiece 
  • Cina Black Nail Art Pen
Thanks For Stopping By!

Thursday, October 25, 2012

Rainbow Gradient Saran Wrap and Leopard Print

Posted by Starlett Approved at 12:46 PM 4 comments
Hey there <3!! I got some colorful nails to share with all of you today.  Boy o' boy do I lurve them. Let's just get right to them...shall we?
Don't these just take you back to the 90's? Lisa Frank EVERYTHING, reading The Babysitters Club and watching Are You Afraid of the Dark?  Ah nostalgia :)
I really love Saran Wrap manicures.  They're so easy and the effect it creates is awesome.  I did 2 Saran Wrap manis for the 31 Day Challenge 2.0, you can see them HERE and HERE.  Each time I tried experimenting with the technique.  Using more than one color and treating it as a base for a design. This time was no different.
For this design I wanted a rainbow gradient effect.  It was pretty simple to achieve.  All I had to do was overlap the polishes :) It's been awhile since I've done leopard print on my nails.  Which is weird because I LOVE leopard print, it's why I started doing nail art.  I wanted fierce nails :)
Is there a specific technique or design that got you interested in nail art?

What I Used:
  • Wet n Wild French White Creme
  • Milani Breezy
  • Milani Tropical Fiesta
  • Sally Hansen Hot Yellow
  • Cina Black Nail Art Pen
Thanks For Stopping By!


Monday, October 1, 2012

31 Day Challenge 2.0 Day 27

Posted by Starlett Approved at 8:34 PM 5 comments
Hi everyone, it's another late post day today :( sorry.  Still feeling a bit under the weather but I couldn't bring myself to not do my next challenge design.  The theme for today is Inspired by Artwork.  I pretty much just googled abstract art to find some inspiration.  I found a couple things but I really liked this graffiti piece in particular.
To successfully transfer the piece into a nail design I visually cut the image up.  This way different parts of the artwork was placed on different nails.  I actually remembered that from Art class in Middle School.  The only difference being, I enlarged a tiny image back then :).
I do love the way they came out, wish I wasn't feeling like crap though.   They could have been better.  I'm so out of it I can't even think of more words to say haha.  So I'm just going to slap another picture here and make the crazy list of polishes I used for this design.  I will see you tomorrow beautiful people!!! 

Polishes Used:
  • Wet n Wild French White Creme
  • Wet n Wild Black Creme
  • Wet n Wild megalast I Need a Refresh-Mint
  • New York Color Sidewalkers
  • New York Color City Sweets Pink
  • Sally Hansen Insta-Dri Brisk Blue
  • Essie Navigate Her
  • Sinful Colors Go Go Girl
  • Milani Jiffy Orange
  • Milani Hot Pink Frenzy
  • Starlicious Lacquer Franken Mustard Shade (name in progress) 
Thanks For Stopping By!!

Thursday, September 13, 2012

31 Day Challenge 2.0 Day 13

Posted by Starlett Approved at 3:33 PM 3 comments
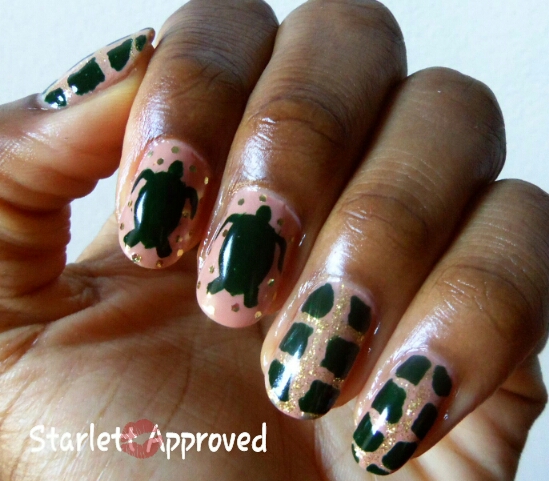
Hey there boos, I see everyone crossed their beautifully manicured fingers for me!  There was a slight hiccup and I was afraid I wouldn't be able to do my nails for todays challenge, which is Animal Print.  I seemed to have pinched a nerve in my right hand that was making movement of my middle finger and my wrist hurt. But all of you hoping for the best for my nails today in the back of your minds haha got me past it.  It still feels a little funky but I feel way better than last night.  Which is great because I was able to do TURTLE nails!!!


I'm so loving these right now.  When I was trying to figure out what I want to do for todays challenge I immediately knew I wanted to to draw the animals silhouette on my nails as a pattern.  Randomly the other day turtles popped into my head.  So I decided hey why not do turtle shell print and turtle silhouette nails.  I was really excited because the last time I did turtle shell nails I used a stamping plate and I've never drawn an animal on my nails before.  Why not let my first be Mr. Starlett Approved's FAVORITE animal in the whole world.
He actually helped me again with these.  I originally didn't have the gold glitter outlines and the gold glitter dots.  I showed him my nails and he suggested I needed to add lines on the shell nails.  What would I do without him? :) I seriously can't stop staring at them, glitter will do that to you haha.  While doing my nails I kept remembering the funniest experience I ever had with a turtle.  Wanna hear it? I'm gonna tell you anyway lol.  
About 2 summers ago Mr. Starlett Approved and I were at the beach.  Enjoying the water and having a blast when I saw something in the water.  It was a turtle about the size of my hand.  I picked it up and showed Charlie.  We were both shocked to find a turtle in the water in Brooklyn.  So I'm holding it and I noticed this black thing coming out from between his legs, I freak out and drop him in the water thinking he's pooping on my hand.  Charlie picks him back up and the black thing is gone.  So I take the turtle back to apologize for dropping him and the black thing came out again.  An already long story short we find out that the turtle is a boy and kind of liked me lol.  It was his little tilly willy haha.  We then took him to Central Parks Turtle Pond to live.  I'm just a bit turtle penis traumatized now, you would be too!

Polishes Used
  • Sephora by O.P.I Nonfat Soy Half Caff
  • Sinful Colors Last Chance
  • Sinful Colors Paris
  • Milani Jewel FX Gold

Thanks For Stopping By!

Tuesday, September 11, 2012

31 Day Challenge 2.0 Day 11

Posted by Starlett Approved at 3:26 PM 2 comments
Hey guys!! It's Day 11, the first day of the Pattern themes.  Todays theme is the ever classic Polka Dots.  I don't do a lot polka dot nails, for some reason I'm not that great at it haha.  Crazy I know, but I always seem to mess something up.  With these nails I think I did pretty good.  Maybe it's because I didn't do a basic polka dot design.  I did strawberries, or strawboobies as my son would call them lol.
These were inspired by my kitchen hand towel.  Everytime I would have it in the kitchen I think 'Oh it's so pretty I should put them on my nails' and I finally did.  I love how they came out, super ca-yute! 
Here I am again using my favorite colors Black and White haha.  Maybe that's why I have so many Untrieds smh.  Well you would be proud of me, this was my first time using the yellow base color.  It's Milani Yellow Whiz, the fast dry one coat formula polish.  I don't know what I did wrong but I needed 2 coats :(. Either 1 coat or 2 coats it's still a gorgeous yellow creme and now 1 of my FAVORITE yellow polishes!
For the strawberries I used a black striper, New York Color French White Tip, which I should retire to my stamping polish pile, and New York Color Sidewalkers.  I'm going to put these nails on my tutorials to do list.  I really enjoyed doing the Watercolor Rainbow Roses picture tutorial.  So I definitely plan on doing more for you guys.

Polishes Used:
  • Milani Yellow Whiz
  • New York Color French White Tip
  • New York Color Sidewalkers
  • Absolute! Nail Art Paint Black
Thanks For Stopping By XOXO
 

Starlett Approved Copyright © 2012 Design by Antonia Sundrani Vinte e poucos