Saturday, September 15, 2012

31 Day Challenge 2.0 Day 15

Posted by Starlett Approved at 6:27 PM 0 comments
Oh Delicate Print...I hated this theme last year and I hate it this year!  Ugh wasn't looking forward to this day.  I attempted feathers last year, didn't want to do that again.  Lace was the other thing that came to mind when I think of delicate print but I wasn't interested in doing that. Then I thought...Needle Dragging! 
Yeah and these were born. My first attempt at needle dragging so I kept it simple.  They look like funky blue ink blots to me.  What do they look like to you?
It's a really cool technique and I really want to try it again.  Maybe even get all fancy with more colors and stuff :) Sorry for such a short post, it's Mr. Starlett Approved's birthday weekend.  Trying to give him all my attention possible!!! :D

Polishes Used:
  • H&M Nail Polish Dust & Diamonds
  • H&M Nail Polish Something Blue
Thanks For Stopping By


Friday, September 14, 2012

31 Day Challenge 2.0 Day 14

Posted by Starlett Approved at 7:02 PM 3 comments
Hey Darlings, how is everyone doing this lovely Friday evening?  I hope marvelously because I not so much. It's just one of those days, ya know.  Maybe I just need a really amazing nights sleep where I also sleep in haha.  A mama could dream right?  My mood is so eh that I did my nails twice today because my first design was super BLECH! These were quick, simple and I like them.
I don't have a lot to say about these.  The sheer base with floral design was borrowed from my mister Candice of MrCandiiPants ;).  She's one of my go to floral girls :) the other being Sara Le of MyNailsAreDope.  Whenever I'm in the mood for flowers on my nails I go straight to their blogs!
The sheer base I used is Revlon Sheer Seafoam. It's so gorgeous in the bottle it's insane but beyond difficult to get it to that shade on the nails :(. The color pops most on the index and middle finger because of the contrast against the minty flowers.  Due to how sheer it is there is Visible Nail Line VNL, which I don't mind too much.  How do you ladies feel about VNL?
Oh my gosh I almost forgot to mention...Check Out The Nubs!!! Yeah I didn't break a nail or anything I just needed a restart. I seriously can't function when my nails get too long.  Which helped because it inspired me to do this design.  10 points for short nails haha!

Polishes Used:
  • Revlon Sheer Seafoam
  • Wet n Wild megalast I Need a Refresh-Mint
  • Sinful Colors Dressed To Kill
Thanks For Stopping By!


Thursday, September 13, 2012

31 Day Challenge 2.0 Day 13

Posted by Starlett Approved at 3:33 PM 3 comments
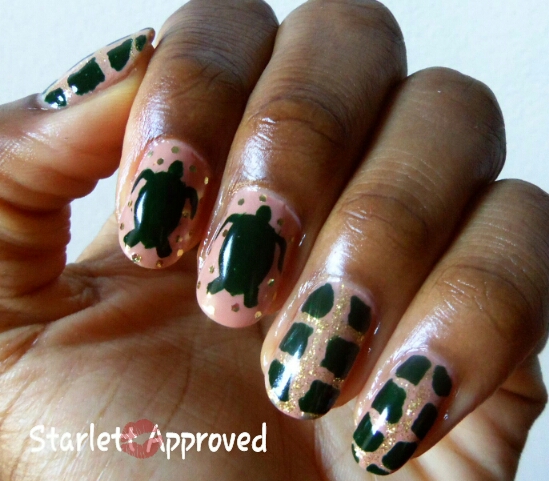
Hey there boos, I see everyone crossed their beautifully manicured fingers for me!  There was a slight hiccup and I was afraid I wouldn't be able to do my nails for todays challenge, which is Animal Print.  I seemed to have pinched a nerve in my right hand that was making movement of my middle finger and my wrist hurt. But all of you hoping for the best for my nails today in the back of your minds haha got me past it.  It still feels a little funky but I feel way better than last night.  Which is great because I was able to do TURTLE nails!!!


I'm so loving these right now.  When I was trying to figure out what I want to do for todays challenge I immediately knew I wanted to to draw the animals silhouette on my nails as a pattern.  Randomly the other day turtles popped into my head.  So I decided hey why not do turtle shell print and turtle silhouette nails.  I was really excited because the last time I did turtle shell nails I used a stamping plate and I've never drawn an animal on my nails before.  Why not let my first be Mr. Starlett Approved's FAVORITE animal in the whole world.
He actually helped me again with these.  I originally didn't have the gold glitter outlines and the gold glitter dots.  I showed him my nails and he suggested I needed to add lines on the shell nails.  What would I do without him? :) I seriously can't stop staring at them, glitter will do that to you haha.  While doing my nails I kept remembering the funniest experience I ever had with a turtle.  Wanna hear it? I'm gonna tell you anyway lol.  
About 2 summers ago Mr. Starlett Approved and I were at the beach.  Enjoying the water and having a blast when I saw something in the water.  It was a turtle about the size of my hand.  I picked it up and showed Charlie.  We were both shocked to find a turtle in the water in Brooklyn.  So I'm holding it and I noticed this black thing coming out from between his legs, I freak out and drop him in the water thinking he's pooping on my hand.  Charlie picks him back up and the black thing is gone.  So I take the turtle back to apologize for dropping him and the black thing came out again.  An already long story short we find out that the turtle is a boy and kind of liked me lol.  It was his little tilly willy haha.  We then took him to Central Parks Turtle Pond to live.  I'm just a bit turtle penis traumatized now, you would be too!

Polishes Used
  • Sephora by O.P.I Nonfat Soy Half Caff
  • Sinful Colors Last Chance
  • Sinful Colors Paris
  • Milani Jewel FX Gold

Thanks For Stopping By!

Wednesday, September 12, 2012

31 Day Challenge 2.0 Day 12

Posted by Starlett Approved at 3:25 PM 7 comments
Hey sexy people, it's hump day ;) and Day 12 of the challenge. What's the theme? STRIPES!!!! Just in case you were wondering. Gonna be honest with you, because that's how I roll. I was VERY uninspired by this theme. I had no idea what I wanted to do for this challenge until yesterday. When I HAD to finally think of something. One idea was pretty cool but I was lazy and tired and knew I didn't have my all to put into the design. So I shelfed it for a later date and did these.
Mr. Starlett Approved actually helped me with this one. Before 90% of my designs I sketch it out in my little notepad, it makes life so much easier. I did just that with these nails and showed my boo to see if he felt it was stripes appropriate. He pointed out that with it just black and white on the paper it didn't look like stripes. It just looked like a random design thing haha. So I ran with it and said you GENIUS so I should designate a specific color for each line!!! He looked completely confused by my rambling and just nodded his head lol.
I bestowed diagonal lines with Sinful Colors Nail Art Bonjour, horizontal lines with Sinful Colors Nail Art A Slice To Go and vertical lines with Sinful Colors Nail Art Moon Light. Then I had to figure out the base color. My mind went straight to white but I didn't want to do another design with white or even black. I love them but I need to use the other 200+ colors in my collection. Then I thought grey would be great and New York Color Sidewalkers is the PERFECT shade of grey.
I don't do a lot of designs like this one and I REALLY love it. I definitely see myself doing more designs like these in the future. Might I say I'm pretty damn proud of my line work as well. No tape needed WHAT! WHAT! :) Can't wait to see you guys tomorrow! I'm very excited about what I have planned. Lets cross our fingers it goes according to plan haha.

Polishes Used:
  • New York Color Sidewalkers
  • Sinful Colors Nail Art A Slice To Go
  • Sinful Colors Nail Art Bonjour
  • Sinful Colors Nail Art Moon Light
Thanks For Stopping By

Tuesday, September 11, 2012

31 Day Challenge 2.0 Day 11

Posted by Starlett Approved at 3:26 PM 2 comments
Hey guys!! It's Day 11, the first day of the Pattern themes.  Todays theme is the ever classic Polka Dots.  I don't do a lot polka dot nails, for some reason I'm not that great at it haha.  Crazy I know, but I always seem to mess something up.  With these nails I think I did pretty good.  Maybe it's because I didn't do a basic polka dot design.  I did strawberries, or strawboobies as my son would call them lol.
These were inspired by my kitchen hand towel.  Everytime I would have it in the kitchen I think 'Oh it's so pretty I should put them on my nails' and I finally did.  I love how they came out, super ca-yute! 
Here I am again using my favorite colors Black and White haha.  Maybe that's why I have so many Untrieds smh.  Well you would be proud of me, this was my first time using the yellow base color.  It's Milani Yellow Whiz, the fast dry one coat formula polish.  I don't know what I did wrong but I needed 2 coats :(. Either 1 coat or 2 coats it's still a gorgeous yellow creme and now 1 of my FAVORITE yellow polishes!
For the strawberries I used a black striper, New York Color French White Tip, which I should retire to my stamping polish pile, and New York Color Sidewalkers.  I'm going to put these nails on my tutorials to do list.  I really enjoyed doing the Watercolor Rainbow Roses picture tutorial.  So I definitely plan on doing more for you guys.

Polishes Used:
  • Milani Yellow Whiz
  • New York Color French White Tip
  • New York Color Sidewalkers
  • Absolute! Nail Art Paint Black
Thanks For Stopping By XOXO

Monday, September 10, 2012

31 Day Challenge 2.0 Day 10

Posted by Starlett Approved at 4:31 PM 1 comments
Hey peoples, it's the last day of the color themes.  Is it just me or did these past 10 days just zoom by? Like a nail art road runner blur.  I guess that's what happens when you're having fun :). Todays theme is Gradient Nails.  I honestly don't think there is anyone in the world that doesn't think gradients are beautiful.
I went for an Autumn theme gradient for todays nails.  A very nice brown and nude gradient with red glitter zebra stripes.  I know you all know of Samantha of The Nailasaurus AH-MAZING Gradient Tutorial. She changed my life with this.  Unfortunately I'm not always patient enough to do it this way.
Yeah I was having an impatient day when doing these.  I still love the way my gradient came out.  Maybe I'll do a tutorial...hmmmmm :). The red glitter zebra stripes was a perfect addition to the neutral base, wouldn't you agree? 
I don't do a lot of zebra stripes because I never loved the way they came out when I did them.  This time I LOVE them! I finally got them right, YES!! Took me long enough haha.  
With the color themes over which was your favorite?
I truly love all of them but my super favorites would have to be Day 7: Black & White and Day 9:
Rainbow.

Polishes Used:
  • Sephora by O.P.I Leotard Optional
  • Sephora by O.P.I Studs & Stilettos
  • L.A. Color Art Deco Red Glitter
Thanks for stopping by XOXO

Watercolor Rainbow Roses Tutorial

Posted by Starlett Approved at 3:12 PM 6 comments

My first tutorial Hooray!!! 

What I used/What You'll Need:
You don't have to use stripers if you don't have a rainbow array of them.  You can use a small dotting tool, toothpick, bobby pin or a nail art brush with any polish you want to use.  In the little dappen dish is the Acetone.
Step 1: Apply your Base Coat, got to protect the babies.
Step 2: Apply your Base Color let it dry a bit.
Then you'll apply top coat to protect the color from the acetone you'll use later. 
Let that dry completely!
Step 3: Place generous (not too much though) small dots of each color in no particular order. 
You can even change up the color placement with each rose.  
Work quickly you don't want it to dry. 
Step 4: Dip your small brush into the acetone and start mixing the colors.
In a dragging motion towards the other colors and the center.
Step 5: You'll do step 3 and step 4 until you have the amount of roses you want.
For the roses that are cut off you'll just use about 3 colors instead of all 6.
Let this dry completely before moving on.
Step 6: Outline your roses, I used a black nail art pen.
You can also use a toothpick or the pointy ended dotting tool.
Let it dry
Then finally, clean up your cuticles and add your topcoat because you're done ;)

I would REALLY LOVE feedback from you on this tutorial.
Do you like it? Was it helpful? Did I explain it well? Should I do more? :)

Please let me know if you use the tutorial to recreate the design! I would LOVE to see it!

Thank you for stopping by XOXO
 

Starlett Approved Copyright © 2012 Design by Antonia Sundrani Vinte e poucos